Accurate Roof Takeoffs – Step 2: (Option 1) Measure the Roof – Manual Methods
Replacing a residential roof requires careful planning and calculation of materials, costs, and labor requirements. The process of estimating materials and dimensions for a roof replacement is called a roof takeoff. A precise takeoff helps ensure that a contractor orders the correct amount and lengths of metal panel, trim, and accessories to manage project costs effectively.
In the previous article in this series we discussed the information you need to collect and questions you should ask before you start your estimation process. Today, we dive into the process for manually measuring a roof.
Obtaining accurate measurements is the foundation of a precise roof takeoff. There are two primary methods to measure a roof: traditional manual measurement and digital measurement.
Traditional Manual Measurements
Manual measurement involves physically accessing the roof to measure its dimensions. While this method is accurate, it is time-consuming and can pose safety risks, particularly on steep or complex roofs. If manual measurements are necessary, follow these steps:
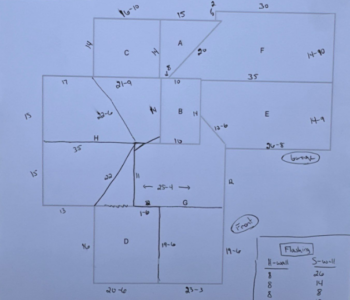
- Draw It Out: Starting from a sketch of the roof, complexities (like valleys, dormers, etc.), obstructions (chimney, vents, skylights, etc.), and which areas are being quoted. For example, the homeowner has requested a roof quote on the home but not the attached garage. You may want to take this opportunity to measure both roof structures in case the customer changes their mind, or you can upsell them later for the garage. Be sure to include trees or wires that overhang the roof as they may make the installation more difficult or require additional labor for removal or proper attention (example: terrain of the yard around home, landscaping, and so on).
- Measure Every Roof Section: Get on the roof and break out the tape measure! With your sketch in hand, break down the roof by section and measure the length and width of each section noting any irregular shapes and oddities, for example, the gutter line being a different length than the ridge or a squaring issue at a corner. This is a good time to note if all corners are square and which direction you will want to lay the metal panels (right to left or left to right), as determined by factors in the style and size of the roof sections as well as the panel chosen.
- Account for Roof Pitch: Calculate the slope factor of every roof section and label the sketch accordingly. This factor is important in calculating the trim bend per roof section and in your own labor estimates, for example, higher slopes may need additional considerations for set-up of equipment and safety tools. Note that many roofs have multiple roof pitches, so be sure to measure each section of roof.
Roof pitch is the ratio of the rise (height) to the run (length) over a 12-inch span. For example, if a roof rises 6 inches for every 12 inches of horizontal distance, it has a 6:12 pitch. Once you know the pitch, you can use the chart below to find the angle of the roof for trim conditions as needed. - Calculate Total Area: Although metal roofing is not sold by “square,” but rather by linear foot, you may need to calculate total area if your customer is considering a variety of roof material options. Start by multiplying the length by the width of each section to find the area. Then add up the areas for all sections to determine the total square footage.

Measurements Collected – What’s Next?
So far, you’ve collected information about the roof and the customers’ vision and ideas and now you’ve collected some hand-measurements of the roof. Before moving into the next step – calculating roof material needed, we will cover the digital method of measuring the roof next, a popular option with roofing contractors due to increasing accuracy of digital systems and the speed and ease of quoting. Until then, if you’d like to learn more about our products and services, please review the products section or contact us to be connected with a salesperson to get started.